
TL;DR:
- Many Kansas City homeowners experience smart device incompatibilities and connectivity issues due to poor planning. Conducting a thorough audit of existing equipment, goals, and compatibility before upgrading ensures successful, long-lasting results. A phased approach, combined with safety checks and professional support, minimizes failures and maximizes smart home effectiveness.
You set up one smart bulb, it works fine, then you add a thermostat and suddenly nothing talks to anything. Sound familiar? Many Kansas City homeowners start their smart home journey with excitement and end up with a pile of devices that barely cooperate. The good news is that a clear, structured workflow changes everything. When you approach upgrades the same way a professional installer would, from auditing what you already have to testing before you commit, you get results that actually stick. This guide walks you through every phase so you can upgrade with confidence.
Table of Contents
- What to consider before upgrading: Devices, goals, and compatibility
- Stepwise smart home upgrade workflow: A phased approach
- Essential safety checks for DIY smart installs
- Installing doorbell cameras and sensors: Setup, placement, and troubleshooting
- Why most smart home upgrades fail—and what KC pros know
- Get expert help with smart home upgrades in Kansas City
- Frequently asked questions
Key Takeaways
| Point | Details |
|---|---|
| Start with an audit | Assess your current devices, goals, and compatibility before upgrading any smart home tech. |
| Use a phased workflow | Upgrade infrastructure and core devices first, then expand to security and entertainment for smoother results. |
| Prioritize safety checks | Always cut power, verify compatibility, and photograph wire labels before DIY installation steps. |
| Optimize device placement | Test placement and signal strength before mounting cameras or sensors to prevent problems. |
| Consider expert help | Professional services can troubleshoot tricky upgrades and ensure lasting, reliable smart home systems. |
What to consider before upgrading: Devices, goals, and compatibility
Before you start swapping out light switches or adding new gadgets, it is essential to assess your home's unique needs and opportunities. Skipping this step is the number one reason upgrades go sideways fast.
A smart home upgrade workflow starts with a thorough audit of your current devices, goals, and compatibility before you spend a single dollar on new equipment. That means walking through your home and taking inventory. Write down every connected or smart device you already own, note what problems you want to solve, whether that is high energy bills, weak security, or clunky manual controls, and list the improvements you want most.
Key things to include in your initial audit:
- Every existing smart device, hub, or controller (brand, model number, communication protocol)
- Problem areas: rooms with temperature swings, entry points with no camera coverage, lights left on all day
- Goals ranked by priority: energy savings, security, convenience, or entertainment
- Your Wi-Fi router model and whether you have a mesh network or a single point setup
Understanding compatibility is where most Kansas City homeowners get tripped up. Smart devices communicate using different wireless protocols. Wi-Fi is the most common and works without an extra hub, but it can strain your network if you add too many devices. Zigbee and Z-Wave are low-energy protocols that require a hub but offer more reliable connections across larger homes. Matter is the newest standard, designed to work across major ecosystems like Amazon Alexa, Google Home, and Apple HomeKit, making future purchases much more flexible.
Check whether your desired upgrades speak the same "language" as your existing equipment. A Zigbee-only sensor will not connect to a Z-Wave hub. A Matter-compatible device can bridge many of those gaps, but only if your hub or router supports it.
| Protocol | Hub required | Range | Best for |
|---|---|---|---|
| Wi-Fi | No | Up to 300 ft | Cameras, thermostats |
| Zigbee | Yes | Up to 300 ft (mesh) | Lighting, sensors |
| Z-Wave | Yes | Up to 330 ft (mesh) | Locks, sensors |
| Matter | Sometimes | Varies | Multi-ecosystem devices |
Setting clear upgrade goals also keeps your budget realistic. Separate your must-haves from your nice-to-haves. If security is your priority, a smart lock and doorbell camera belong in phase one. Automated window shades can wait.
Learning how to boost efficiency and security through well-chosen upgrades helps you zero in on the changes that deliver the most tangible value. Many Kansas City homeowners find that a few targeted upgrades make a bigger daily difference than a dozen disconnected gadgets.
Pro Tip: Use your smartphone to photograph every existing device, its model number label, and any wiring diagrams you find. These photos save enormous time when you are shopping online or talking to a Kansas City smart home upgrade specialist.
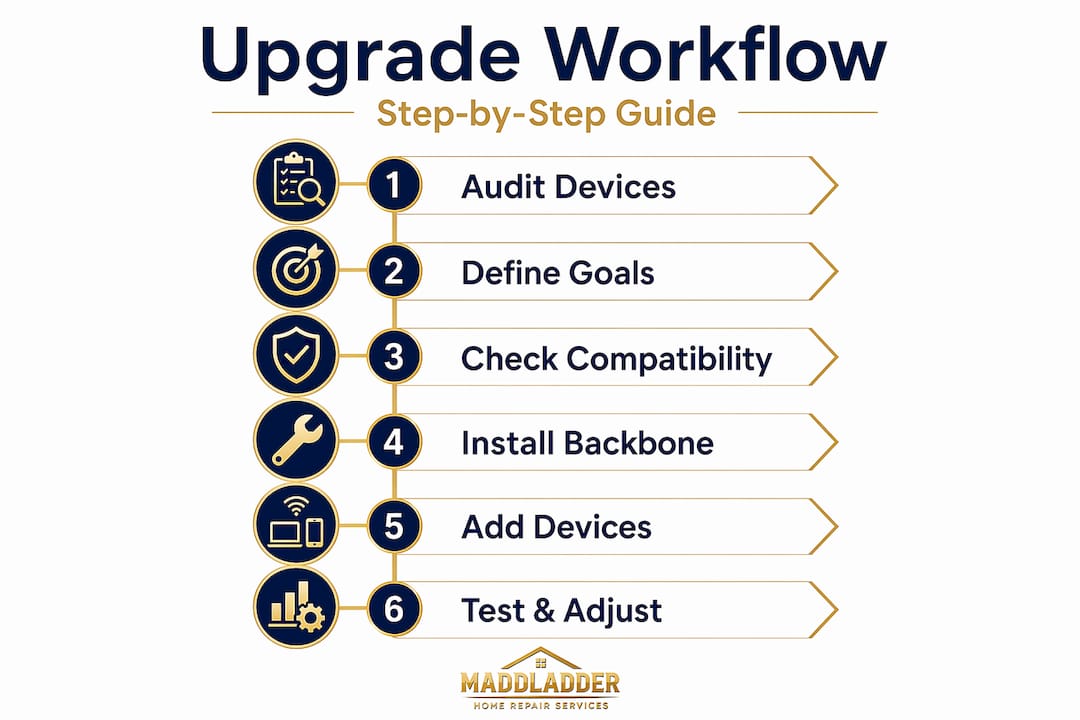
Stepwise smart home upgrade workflow: A phased approach
Once you know what you want and need, organizing the work into clear, manageable phases sets you up for success without overwhelming your budget or sanity.
A phased methodology is the proven approach: upgrade backbone infrastructure first, then expand to lighting and climate, followed by security, and finally entertainment and appliances. Each phase builds on a stable foundation, so you are not troubleshooting five new devices at once.
Here is how a typical four-phase rollout looks:
-
Phase 1: Backbone and connectivity. Upgrade your router or add a mesh network if your Wi-Fi is weak. Install your primary hub if you plan to use Zigbee or Z-Wave devices. A strong digital foundation here prevents signal issues in every later phase.
-
Phase 2: Lighting and climate. Smart switches, dimmers, and a smart thermostat deliver immediate comfort and energy savings. These are also the upgrades with the shortest payback period. A programmable thermostat alone can cut heating and cooling costs significantly over a Kansas City winter.
-
Phase 3: Security features. Smart locks, doorbell cameras, motion sensors, and indoor cameras go in next. By this point your network is stable and your hub is configured, so adding security devices is much smoother.
-
Phase 4: Entertainment and appliances. Smart speakers, TV integrations, connected appliances, and voice-activated scenes round out the system. These are the fun extras that work best when everything else is already humming.
| Phase | Focus area | Examples | Typical timeline |
|---|---|---|---|
| 1 | Backbone | Mesh router, hub | Week 1 |
| 2 | Comfort | Smart thermostat, lighting | Weeks 2 to 3 |
| 3 | Security | Cameras, locks, sensors | Week 4 |
| 4 | Entertainment | Smart speakers, appliances | Week 5 and beyond |
Testing between phases is not optional. After Phase 1, confirm your Wi-Fi reaches every corner of your home. After Phase 2, run your thermostat schedule for a full week before moving on. Small problems caught early cost you far less time and money than issues discovered after Phase 4.
Pro Tip: When choosing a hub, look for one that supports Zigbee, Z-Wave, and Matter simultaneously. This future-proofs your investment so you can add virtually any smart device to your ecosystem without starting over.
Essential safety checks for DIY smart installs
Before diving into installation, prioritize safety and device compatibility to prevent costly mistakes.
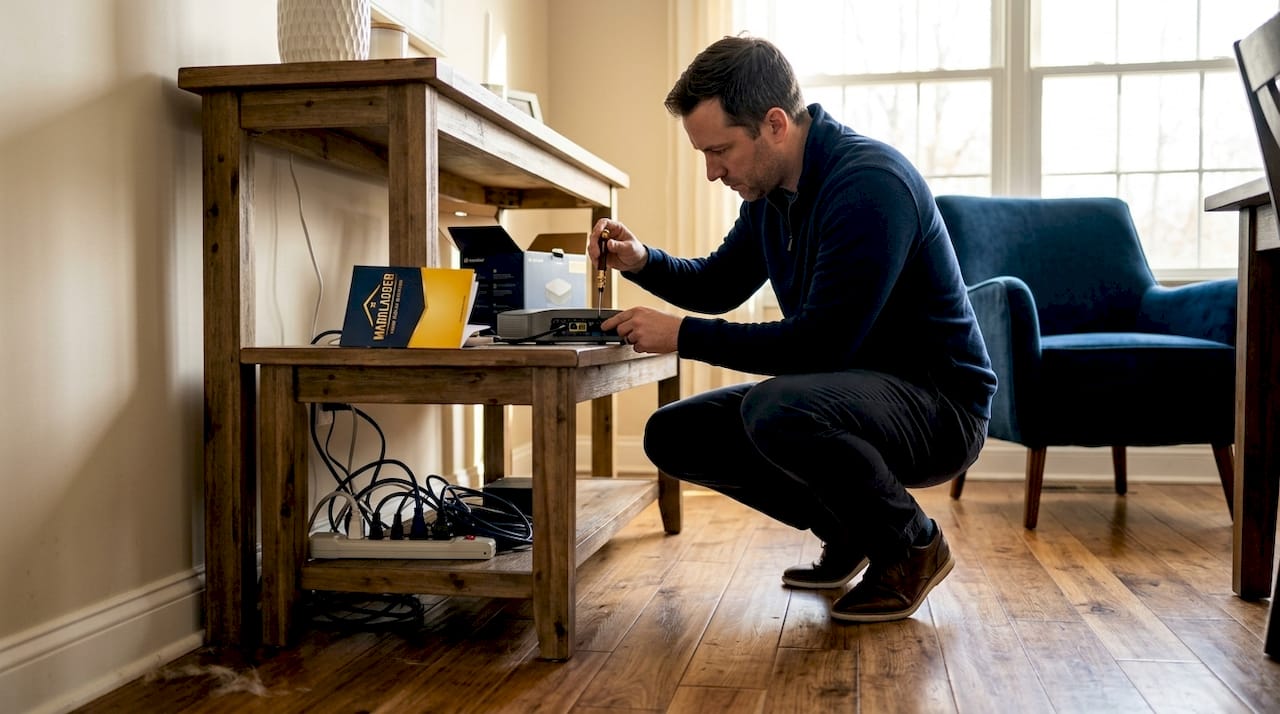
Electrical work, even the relatively simple kind involved in smart thermostat or switch installations, carries real risk. Burns, shocks, and fried circuit boards are all common consequences of rushing or skipping steps. Understanding minor electrical repairs and the safety steps behind them is not optional for DIYers.
Safety and compatibility verification for DIY thermostat and hardwired device installations includes checking HVAC wiring compatibility, photographing existing wire labels, and cutting power at the breaker before touching any connections.
Follow these steps in order every time you install a hardwired device:
- Go to your electrical panel and switch off the correct breaker. Use a non-contact voltage tester to confirm the power is actually off before you touch a single wire.
- Photograph every wire connection in place before removing anything. Label each wire with a small piece of masking tape if there are more than three wires.
- Look up your new device's wiring diagram in the manufacturer's instructions and compare it to what you photographed. If there is a wire in your current setup that does not appear in the new diagram, stop and research before proceeding.
- Check your HVAC system's compatibility with your chosen thermostat. Older two-wire systems and heat-only setups often lack a C-wire (common wire), which many smart thermostats require for steady power. Some thermostats include an adapter, but others do not.
- Make all new connections firmly, restore power, and test the device immediately.
What to keep nearby during any hardwired installation:
- Non-contact voltage tester
- Flathead and Phillips screwdrivers
- Needle-nose pliers
- Masking tape and a marker for wire labeling
- Your smartphone for photos and for pulling up the manufacturer's app
"Many smart device failures happen not because of internet issues, but because of small compatibility or wiring missteps."
Hardwired device failures often trace back to electrical or HVAC compatibility issues, not Wi-Fi, making power-off confirmation and correct wire mapping the most critical steps before any connection is touched.
If you are ever unsure, especially if you see wiring that does not match the diagram or a system that behaves unexpectedly after installation, consulting a DIY electrical safety guide or calling a professional is always the right call.
Installing doorbell cameras and sensors: Setup, placement, and troubleshooting
With major electrical and compatibility checks complete, installing smart security devices like cameras and sensors comes next.
Doorbell camera installation is hub and placement driven: gathering tools, following the kit's sensor and hub setup flow in order, and choosing strong signal locations are the steps that separate a clean install from a frustrating troubleshooting session.
Step-by-step installation process for doorbell cameras and sensors:
- Gather everything before you start: drill and bits, level, mounting hardware from the kit, your smartphone with the manufacturer's app already downloaded, and a ladder if your intended mounting point is high.
- Set up the hub or base station indoors first if your system requires one. Connect it to your router and confirm it is online before mounting anything outside.
- Choose your camera or sensor location. For doorbell cameras, position the unit at roughly chest height to capture faces clearly. For motion sensors, aim for corners that cover natural walking paths without pointing directly at heat sources like windows or vents that trigger false alarms.
- Test the Wi-Fi signal at the exact spot you plan to mount. Walk to that location with your smartphone and run a quick speed test or check your Wi-Fi signal bars. A weak signal at the mounting location means you will have constant video dropouts after installation.
- Mount the device using the included hardware. Most doorbell cameras require drilling into brick, wood trim, or siding, so choose the right drill bit for your surface. Use a level to avoid a crooked mount.
- Connect the device to your hub or app, run the pairing sequence, and test motion detection and live video before considering the job done.
Common placement mistakes to avoid:
- Mounting cameras too high, which captures the tops of heads instead of faces
- Placing motion sensors in direct sunlight or near HVAC vents
- Installing cameras where Wi-Fi signal drops below three bars
- Overlooking side entry points like gates or basement doors
Pro Tip: Before drilling a single hole, hold the camera or sensor in place and use your phone to check live signal strength in the app. Thirty seconds of testing saves hours of remounting.
Reviewing a thorough KC camera installation guide can also help you map out coverage zones across your whole property before committing to mounting locations.
Why most smart home upgrades fail—and what KC pros know
Having walked through the practical workflow, let us look at why many projects stumble and how the right mindset makes a real difference.
Here is an honest truth that most guides avoid saying out loud: the majority of failed smart home upgrades are not technology failures. They are planning failures. Homeowners get excited by a sale or a new product review, buy a handful of devices, and start installing without checking whether any of it works together. Three weekends later they have a thermostat that will not connect, a camera that drops offline every night, and a hub that was never compatible with half of what they bought.
What experienced Kansas City installers do differently is not magic. They spend more time in the audit and planning phase than in the actual installation phase. They know that a solid network and the right hub choice makes every subsequent device easier to set up. They also know when to stop. If a wiring situation looks unfamiliar or a device behaves unexpectedly after a correct install, a pro does not keep guessing. They verify and consult before going further.
The other thing that separates successful upgrades is ongoing learning. Smart home protocols evolve fast. Matter, for example, changed what ecosystem lock-in even means for homeowners. Pros stay current on those shifts so they can recommend devices that will still be relevant and supported three years from now, not just ones that are trending today.
For Kansas City homeowners, the practical takeaway is this: prioritize safety first, integration second, and aesthetics third. A camera that works reliably beats a fancy one that drops offline. A thermostat correctly wired to your HVAC beats a premium model installed incorrectly. And for projects that involve real electrical work or complex multi-device integration, the value of expert installation tips and professional support is almost always worth the investment.
Get expert help with smart home upgrades in Kansas City
If your upgrade feels daunting or you hit a roadblock, Kansas City pros offer hands-on help to turn your vision into reality.
There is a point in most smart home projects where a second set of trained eyes saves you significant time, frustration, and potential cost from a miswired device or a poorly placed camera. MaddLadder's team works with Kansas City homeowners every week on exactly these kinds of projects, from single-device installs to full phased rollouts.

Whether you need a professional to handle your smart home upgrades from start to finish, get help with a tricky professional install and assembly situation, or need an assessment of what to repair or replace in your current setup, MaddLadder offers free estimates and flexible pricing starting at $75 per hour. No project is too small, and no compatibility problem is too confusing. Reach out today and let a local pro take the guesswork out of your smart home upgrade.
Frequently asked questions
What is the first step in a smart home upgrade workflow?
The first step is to audit your current setup, define your goals, and check device compatibility before buying or installing anything new.
How can I avoid wiring mistakes when installing a smart thermostat?
Turn off power at the breaker, photograph existing wire labels and connections, and double-check HVAC compatibility before disconnecting anything.
Can I add new devices in stages, or do I need to upgrade everything at once?
A phased upgrade approach lets you start with core systems, test them thoroughly, and expand gradually without creating compatibility chaos.
What's the biggest mistake KC homeowners make with DIY smart home upgrades?
Skipping safety and compatibility checks is the most common DIY error, and it leads to device failures, signal issues, or real safety hazards.
How do I make sure my doorbell camera gets the best coverage?
Pick a spot with strong Wi-Fi signal and clear sightlines to entry points, and test placement in your app before drilling any mounting holes.