
TL;DR:
- Replacing fixtures involves safely turning off power, inspecting wiring, and following a step-by-step process.
- Homeowners need proper tools and verification to avoid hazards and ensure a secure fixture installation.
Step by step fixture replacement is the process of safely removing an old ceiling light or wall sconce and installing a new one to improve your home's lighting and appearance. Most homeowners can complete a standard replacement in 30–45 minutes when the wiring and junction box are in good condition. The industry term for this work is "light fixture installation," and it covers everything from ceiling pendants to wall sconces. You need the right tools, a clear safety protocol, and a step-by-step plan before you touch a single wire.
What tools and materials do you need before starting fixture replacement?
The right tools prevent delays and keep you safe. Showing up at the ladder without a voltage tester or wire stripper is the fastest way to turn a 45-minute job into a two-hour ordeal.
Essential tools for every fixture installation:
- Non-contact voltage tester (confirms power is off without touching wires)
- Phillips and flathead screwdrivers
- Wire stripper
- Needle-nose pliers
- Electrical tape
- Wire connectors (wire nuts)
- Sturdy ladder
- Drop cloth (protects floors and catches falling screws)
The complete tool list also includes safety gear. Insulated gloves and safety goggles protect you from sharp metal edges and any unexpected arc. Never skip the gloves when working near wiring, even with the breaker off.
Pro Tip: Lay a drop cloth directly under the fixture before you start. Place all screws and wire nuts on it as you remove them. You will not be hunting for a screw on the floor when your arms are above your head.
| Tool | Essential or Optional | Why You Need It |
|---|---|---|
| Non-contact voltage tester | Essential | Confirms power is off before touching wires |
| Wire stripper | Essential | Removes insulation cleanly without nicking copper |
| Needle-nose pliers | Essential | Bends wire ends into loops for secure connections |
| Electrical tape | Essential | Insulates exposed wire ends as a backup |
| Drop cloth | Optional | Protects floors and keeps hardware organized |
| Magnetic parts tray | Optional | Holds screws and small hardware within reach |
How do you safely shut off power before replacing a fixture?
Power shutoff is the single most critical step in any fixture installation guide. Skipping it or doing it wrong causes electrical shock, which can be fatal.
Follow these steps in order:
- Locate your main breaker panel, usually in a utility room, garage, or basement.
- Identify the breaker labeled for the room or circuit where the fixture is located.
- Flip that breaker to the OFF position.
- Return to the fixture and flip the wall switch on and off. The light should not respond.
- Use your non-contact voltage tester on a known live outlet nearby to confirm the tester is working.
- Hold the tester near the fixture wires. No beep or light means power is off.
The two-step verification of breaker off plus voltage tester check is mandatory. Do not rely on the wall switch alone.
Warning: The most common mistake in DIY fixture replacement is assuming the wall switch cuts all power. Mislabeled breaker panels and shared circuits mean wires can stay live even after the switch is off. Always verify with a tester.
Older homes built before 1980 are especially prone to mislabeled panels and non-standard wiring. If your tester shows any voltage after flipping the breaker, stop and call a licensed electrician before proceeding.
Pro Tip: Test your voltage tester on a working outlet before you use it on the fixture wires. A dead battery in the tester gives a false "safe" reading, which is a serious hazard.
What is the step-by-step process to remove and install a fixture?
This is the core of any home fixture upgrade. Work through each step in order and do not skip ahead.
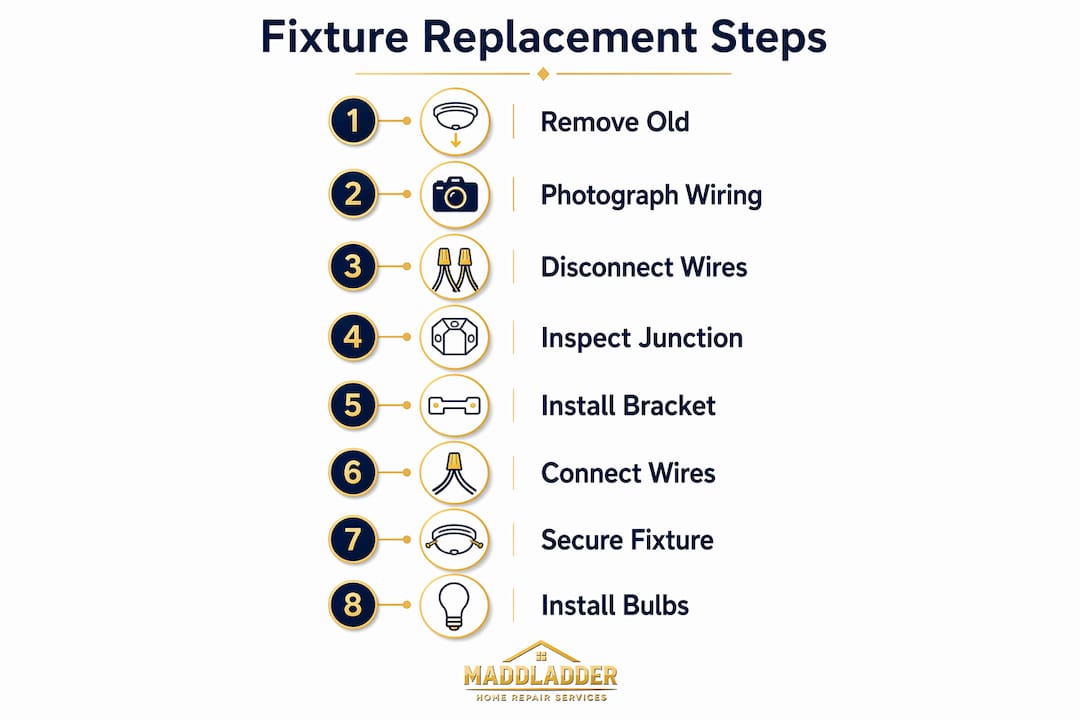
Step 1: Remove the old fixture
Unscrew the canopy (the decorative cover plate) from the ceiling. Support the fixture with one hand or use a helper. Old fixtures can be heavier than they look, and dropping one damages the junction box.
Step 2: Photograph the wiring
Before you disconnect a single wire, take a clear photo of the existing connections. Photographing wiring before disconnecting is a critical accuracy measure, especially in older homes where wire colors may not follow modern standards. You will reference this photo during reinstallation.
Step 3: Disconnect the wires and remove the mounting bracket
Unscrew the wire nuts and separate the connections. Remove the old mounting bracket from the junction box. Set all hardware aside on your drop cloth.
Step 4: Inspect the junction box
Standard residential junction boxes support up to 50 lbs. If your new fixture weighs more, you must install an expandable brace bar between ceiling joists before proceeding. Check the box for cracks, loose mounting, or signs of heat damage. A compromised box is a fire risk.
Also inspect the wiring condition. Brittle insulation or discolored wires signal degraded wiring that needs professional attention before you install anything new.
Step 5: Install the new mounting bracket
Attach the new mounting bracket from your fixture's hardware kit to the junction box. Most kits include a crossbar that adjusts to fit standard box openings. Tighten the screws firmly. A loose bracket causes fixture wobble and, over time, can loosen the junction box itself.
Step 6: Connect the wires
Match black to black (hot), white to white (neutral), and connect the bare copper or green wire to the ground screw or ground wire. Twist wire nuts clockwise until snug. Tug each connection gently to confirm it holds. Wrap each wire nut with a half-turn of electrical tape for extra security.
Pro Tip: If your new fixture has a ground wire but the junction box has no ground wire in the wall, connect the fixture ground to the metal junction box screw. This is a code-compliant grounding method for older homes.
Step 7: Secure the fixture base
Fold the wires neatly into the junction box. Press the fixture canopy against the ceiling and thread the mounting screws through the canopy holes into the bracket. Tighten evenly on both sides to keep the fixture level.
Step 8: Install bulbs and test
Install bulbs within the fixture's stated wattage limit. Exceeding the wattage rating overheats the socket and creates a fire hazard. Restore power at the breaker and flip the wall switch. The fixture should light immediately.
| Step | Action | Common mistake to avoid |
|---|---|---|
| 1. Remove old fixture | Unscrew canopy, support weight | Letting fixture hang by wires |
| 2. Photograph wiring | Capture all connections clearly | Skipping photo, then guessing colors |
| 3. Disconnect and remove | Separate wires, remove bracket | Pulling wires roughly from box |
| 4. Inspect junction box | Check weight rating and condition | Installing heavy fixture on standard box |
| 5. Install new bracket | Attach crossbar, tighten screws | Leaving bracket loose |
| 6. Connect wires | Black to black, white to white, ground | Reversing neutral and hot wires |
| 7. Secure fixture base | Fold wires, attach canopy evenly | Overtightening one side, causing tilt |
| 8. Test | Install bulbs within wattage, restore power | Using bulbs that exceed wattage rating |
How do you troubleshoot common fixture installation problems?
A fixture that does not light after installation almost always has one of a few fixable causes. Work through this list before assuming the fixture is defective.
- Light does not turn on: Check black-to-black and white-to-white connections first. Loose wire nuts at these points are the most common cause of a non-functioning fixture.
- Breaker trips immediately: A tripped breaker after restoring power signals a short circuit. Turn off the breaker, reopen the canopy, and check for any bare wire touching the metal box or another wire.
- Fixture flickers: Flickering usually means a loose connection or a bulb not fully seated. Tighten all wire nuts and reseat the bulbs.
- Fixture wobbles: The mounting bracket is loose or the canopy screws are uneven. Turn off power, reopen, and retighten the bracket screws.
- Burning smell: Turn off power immediately. A burning smell indicates overheating from a wattage mismatch or a damaged wire. Do not restore power until a licensed electrician inspects the wiring.
- Old or damaged wiring: Degraded wire insulation is not a DIY fix. Call a professional if you see crumbling or discolored insulation.
What are the safety and maintenance best practices after fixture replacement?
A successful installation is only the start. Regular maintenance keeps your fixture safe and extends its life.
- Check the fixture mounting every six months. Vibration from doors and HVAC systems gradually loosens screws.
- Replace bulbs with the wattage and type listed on the fixture label. Swapping to LED bulbs within the rated wattage is the best upgrade you can make. The U.S. Department of Energy confirms that replacing inefficient fixtures with LED-compatible models saves energy and improves light quality.
- Avoid overloading the circuit. Plugging high-draw appliances into the same circuit as a new fixture can cause flickering or tripped breakers.
- Inspect the junction box once a year for any signs of moisture, rust, or loose mounting.
- Reuse structural components only if they are code-compliant. Replace aging sockets, wiring, and grounding hardware even if the box itself looks fine.
- Consider smart home upgrades like smart dimmers or connected bulbs when replacing fixtures in living rooms or bedrooms. These integrate with most standard junction boxes and add real convenience.
Key Takeaways
Safe, successful fixture replacement depends on proper power shutoff, the right tools, and following each installation step in the correct order.
| Point | Details |
|---|---|
| Power shutoff is non-negotiable | Turn off the breaker and verify with a voltage tester before touching any wire. |
| Junction box weight matters | Standard boxes hold up to 50 lbs; heavier fixtures require an expandable brace bar. |
| Photograph wiring first | A photo of existing connections prevents costly rewiring mistakes during installation. |
| Match wire colors exactly | Black to black, white to white, and ground to ground is the rule with no exceptions. |
| LED upgrades pay off | Replacing old fixtures with LED-compatible models cuts energy use and improves light quality. |
What I have learned from years of fixture replacements
The first time I replaced a ceiling fixture, I skipped the photo step. I was confident I could remember which wire went where. I was wrong. I spent an extra 30 minutes sorting out a white wire that had been used as a hot conductor in a 1970s installation. That one mistake cost me more time than the entire rest of the job.
The photo habit is the single best practice I can pass on. It costs you 10 seconds and saves you from a genuinely confusing situation when you are standing on a ladder with wires dangling in your face.
The other lesson I keep relearning: do not rush the junction box inspection. Homeowners often focus entirely on the new fixture and give the box a two-second glance. A cracked box or a loose mounting screw is invisible until the fixture starts to sag six months later. Spend two minutes on the box. Check the fixture weight limits and look at the wiring condition honestly.
DIY fixture replacement is genuinely within reach for most homeowners. The steps are not complicated. What separates a clean job from a frustrating one is patience and preparation, not skill. If you hit something unexpected, like wiring that does not match any color standard you recognize, stop and call a professional. That is not failure. That is good judgment.
— Jennifer
When Maddladder makes the job easier
Some fixture replacements are straightforward. Others involve older wiring, heavy chandeliers, or junction boxes that need reinforcement before anything new goes up. Maddladder handles all of it for Kansas City homeowners who want the job done right without the guesswork.

Maddladder's repair and replacement services cover fixture installation, minor electrical repairs, and full electrical and plumbing work for projects that go beyond a standard swap. The team is licensed, responsive, and familiar with the wiring quirks common in Kansas City homes. Free estimates are available, and one-time service starts at $75/hour. If your project involves a heavy fixture, an older home, or wiring you do not recognize, reach out before you start.
FAQ
How long does a standard fixture replacement take?
A standard ceiling light fixture replacement takes 30–45 minutes when the wiring and junction box are in good condition. Older homes with non-standard wiring may add time.
Do I need to turn off the main breaker or just the wall switch?
Always turn off the breaker at the main panel. The wall switch alone does not cut all power to the wiring, and mislabeled panels make this risk even greater.
What if my new fixture is heavier than the old one?
Check the junction box rating before installing. Standard boxes support 50 lbs maximum. Heavier fixtures require an expandable brace bar installed between ceiling joists.
Why does my new fixture not turn on after installation?
The most common cause is a loose wire connection. Recheck the black-to-black and white-to-white connections first, then confirm the breaker is fully on and the bulb is within the wattage rating.
When should I call a professional instead of doing it myself?
Call a licensed electrician if you find brittle or discolored wiring, if the breaker trips after installation, or if the wiring colors do not match any standard you recognize. Maddladder offers fixture installation help for Kansas City homeowners who want a second set of expert hands.