

When your renovation touches a "primary function area" — a dining room, a retail floor, an exam room, a lobby — you must provide an accessible path of travel to that area unless doing so is disproportionate. Disproportionate has a specific legal meaning here: path-of-travel costs that exceed 20% of the total cost of the alteration to the primary function area itself. That single number drives most of the budgeting decisions in this guide.
Three sources govern almost everything else you'll need: the U.S. Access Board, which writes the technical guidelines; the DOJ's Civil Rights Division at ADA.gov, which enforces Title II and Title III; and the ADA Standards for Accessible Design, the 2010 rulebook that spells out both scoping (what triggers a requirement) and technical specs (how big, how wide, how far). The ADA National Network (adata.org) is the practical resource layer on top of all three, with regional technical assistance centers that answer facility-level questions the statute itself doesn't spell out.
Here's the three-step version you can act on today:
- Audit every space affected by the planned alteration and flag anything that qualifies as a primary function area.
- Prioritize the path of travel to that area, since it's the one obligation the DOJ treats as non-negotiable up to the 20% cap.
- Document every cost, contractor quote, and infeasibility argument before you spend a dollar, not after.
Pro Tip: Pull the Access Board's Chapter 2 guide before you finalize scope with an architect. It's the single document that resolves more scoping disputes than anything else in the field.
Key Takeaways
| Point | Details |
|---|---|
| Know your trigger | An "alteration" changes usability; routine maintenance like painting or reroofing does not trigger scoping. |
| Apply the 2010 Standards | Construction and alterations starting after March 15, 2012 fall under the current ADA Standards. |
| Respect the 20% cap | Path-of-travel spending is required up to 20% of the primary function area alteration cost, not beyond it. |
| Document infeasibility early | Structural reports, multiple contractor quotes, and photos build a defensible file before regulators ask. |
| Bring in the right execution partner | MaddLadder handles grab bars, ramps, hardware, and fixture adjustments with documentation support for your permit file. |
Table of Contents
- How does the ADA compliance upgrades guide apply to your project?
- Which ADA Standards apply to your alteration?
- What does the 20% disproportionate-cost rule actually limit?
- What counts as readily achievable barrier removal?
- What technical elements come up most in ADA upgrades?
- How do you plan and execute an ADA upgrade project?
- How do you document technical infeasibility or disproportionate cost?
- What does a practical ADA retrofit checklist look like on-site?
- What pitfalls put ADA compliance at risk after upgrades finish?
- Why proactive ADA upgrades pay off more than reactive fixes
- How MaddLadder handles ADA upgrades for your facility
- Where to find the official ADA compliance documents
- Sources
How does the ADA compliance upgrades guide apply to your project?
Not every renovation triggers ADA obligations, and this is where most facility managers get tripped up. The ADA defines an "alteration" as a change that affects the usability of a building or a portion of it — remodeling a restroom, reconfiguring a retail counter, widening a doorway during a buildout. Routine maintenance doesn't count. Reroofing, painting, wallpapering, and standard electrical or mechanical upkeep fall outside the definition, a distinction laid out clearly in UC Berkeley's Disability Access Center reference on alterations.
That line matters because it determines whether you owe path-of-travel upgrades at all. Replace a worn commercial carpet with the same product in the same layout, and you're probably fine. Reconfigure that same space to add fixed seating or move a service counter, and you've likely triggered alteration scoping.
An alteration is any change to a building or facility that affects or could affect the usability of the building or facility or any part of it. Normal maintenance, reroofing, painting or wallpapering, or changes to mechanical and electrical systems are not alterations unless they affect usability.
Who's covered depends on what kind of entity you run. Title II covers state and local government facilities and uses a "program access" standard: the government service, not necessarily every building, must be accessible overall. Title III covers privately owned public accommodations and commercial facilities, and layers two separate obligations on top of each other: alteration requirements (triggered by construction) and a standing duty to remove barriers that are "readily achievable" even without any construction underway.
Pro Tip: Before you finalize any scope of work, ask your architect or GC three questions: Does this project change how the space is used or accessed? Does it touch a primary function area? Is the permit application describing this as new construction, an alteration, or an addition? The answers determine which rulebook applies.
Which ADA Standards apply to your alteration?
The short answer: almost every project underway now falls under the 2010 ADA Standards, but the history matters because older buildings sometimes carry mixed compliance obligations from earlier construction phases.
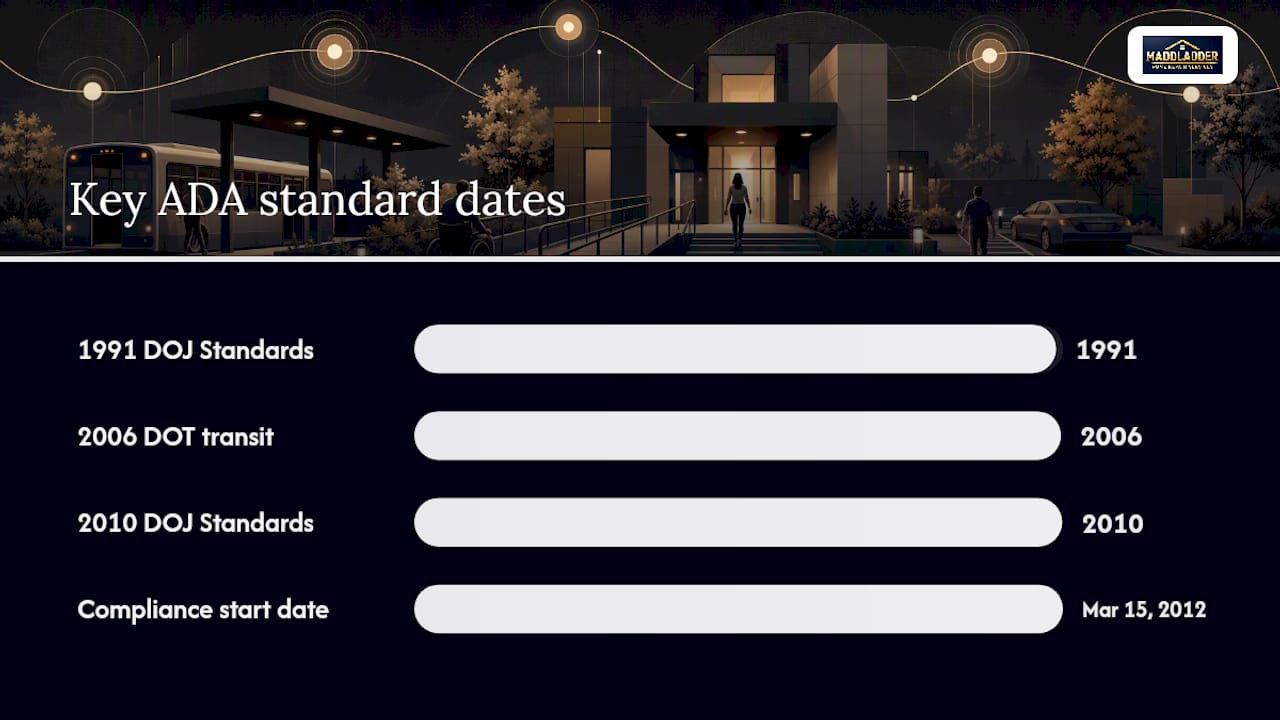
The DOJ has published three generations of technical requirements. The original 1991 Standards governed construction and alterations for years before being superseded. The Department of Transportation maintains its own 2006 standards for transit facilities, a narrower category most commercial facility managers won't encounter. Then the DOJ adopted the 2010 Standards as the current baseline for both Title II and Title III facilities, with a compliance date that made them mandatory for construction and alterations commenced after March 15, 2012.
Here's the practical decision path for figuring out which standard governs your project:
- Check your permit application or construction start date. If it's after March 15, 2012, the 2010 Standards apply, full stop.
- Confirm whether your facility is a Title II government building or a Title III commercial/public accommodation. This affects some scoping thresholds but not the underlying technical dimensions.
- Determine whether the project is new construction, an alteration, or an addition. Additions generally must meet new-construction standards even when the rest of the building is older and only partially compliant.
- If you manage a facility that predates the ADA entirely, don't assume grandfathering protects you. Any alteration since 1992 was subject to whichever standard was current at that time, and alterations now are subject to the 2010 Standards regardless of the building's original construction date.
A few things to keep on your reference shelf:
- The Guidance on the 2010 ADA Standards walks through exactly what changed between 1991 and 2010, which matters if you're comparing an older compliance report against current requirements.
- The 2010 Standards index at ADA.gov hosts the full PDF text, organized by chapter, so you're not relying on a summary when a contractor asks for the exact section.
- If your facility is a Title II entity managing digital services alongside your physical space, note that DOJ's web and mobile app rule set separate compliance deadlines for state and local government digital accessibility, with dates running to April 2027 and April 2028 depending on entity size. That's a parallel track, not a substitute for physical compliance.
What does the 20% disproportionate-cost rule actually limit?
The path of travel isn't just the hallway leading to your altered room. It's the whole functional route: the accessible route from the site's boundary or parking, the entrance itself, restrooms serving the altered area, drinking fountains, and public telephones where they still exist as a facility amenity. When you alter a primary function area, the DOJ expects you to bring that entire chain up to standard, not just the room you touched.
The 20% cap is where budgets get real. Your mandatory path-of-travel spending caps at 20% of the cost of your alteration to the primary function area, even if a full accessible-route retrofit would cost more. Costs counted toward that 20% include the accessible route itself, restroom modifications, and signage, generally excluding unrelated work like cosmetic finishes that don't affect accessibility.
When the cost of alterations necessary to make the path of travel to the altered area fully accessible is disproportionate to the cost of the overall alteration, an accessible path of travel is still required to the extent it can be provided without incurring disproportionate cost.
That means hitting the cap doesn't excuse you from doing anything. It just tells you where to stop, and it obligates you to spend the full 20% on the highest-priority items first, not save some behind because you found a cheaper alteration elsewhere.
| Item | Threshold or Date | Source |
|---|---|---|
| Disproportionate-cost cap | 20% of total alteration cost to the primary function area | U.S. Access Board |
| 2010 Standards compliance date | Construction/alterations starting on or after March 15, 2012 | Federal Register, DOJ |
| Title II web/mobile app compliance | April 2027 and April 2028 depending on entity size | DOJ Small Entity Compliance Guide |
When the cap forces tradeoffs, prioritize in this order, drawn from the Access Board's own guidance on restoring core access first:
- Accessible entrance to the building or facility.
- Accessible route from the entrance to the altered primary function area.
- At least one accessible restroom serving that altered area.
- Accessible telephones, drinking fountains, and signage.
Pro Tip: *Get your general contractor to break the bid into "primary function area" costs and "path of travel" costs as two separate line items from day one.
What counts as readily achievable barrier removal?
Outside of any construction project, Title III still requires public accommodations to remove architectural barriers when doing so is "readily achievable," meaning easily accomplishable without significant difficulty or expense. This obligation exists independent of alterations. You don't need a construction permit to trigger it. You need an existing barrier and the resources to fix it without undue burden.
What counts as readily achievable depends heavily on the size and resources of the business. A single-location retail shop and a regional property management company won't be held to the same bar for the same fix, even for an identical barrier. The DOJ evaluates the nature and cost of the modification against the entity's overall financial resources, not just the branch location's petty cash.
Common readily achievable measures include, though these examples are illustrative rather than an exhaustive checklist:
- Installing grab bars in restrooms.
- Repositioning furniture, shelving, or display racks to widen aisles.
- Adding tactile and visual signage at room entrances.
- Replacing round doorknobs with lever hardware.
- Installing a threshold ramp over a small step or level change.
- Adding a curb-height ramp at a parking or sidewalk transition.
When you decide a measure isn't readily achievable, write down why. Get a written cost estimate, note the entity's actual financial position at the time, and keep that record. Regulators and courts look at what was documented at the time of decision, not what sounds reasonable after the fact.
Pro Tip: If you're not sure where to start, grab-bar installation and door hardware swaps are almost always readily achievable regardless of business size. They're also two of the cheapest upgrades to get wrong when installed by someone unfamiliar with proper blocking and fastener specs, so don't treat "quick win" as license to skip a qualified installer.
What technical elements come up most in ADA upgrades?
Most retrofit projects touch the same handful of building elements, and each has its own compliance triggers.
Entrances and doors. Clear width, maneuvering clearance, and door hardware operability (no twisting or tight grasping required) are the most commonly cited failure points. Reference the exact clear-width and clearance figures in the 2010 Standards rather than working from memory. Approximate numbers from a previous project are a common source of failed inspections.
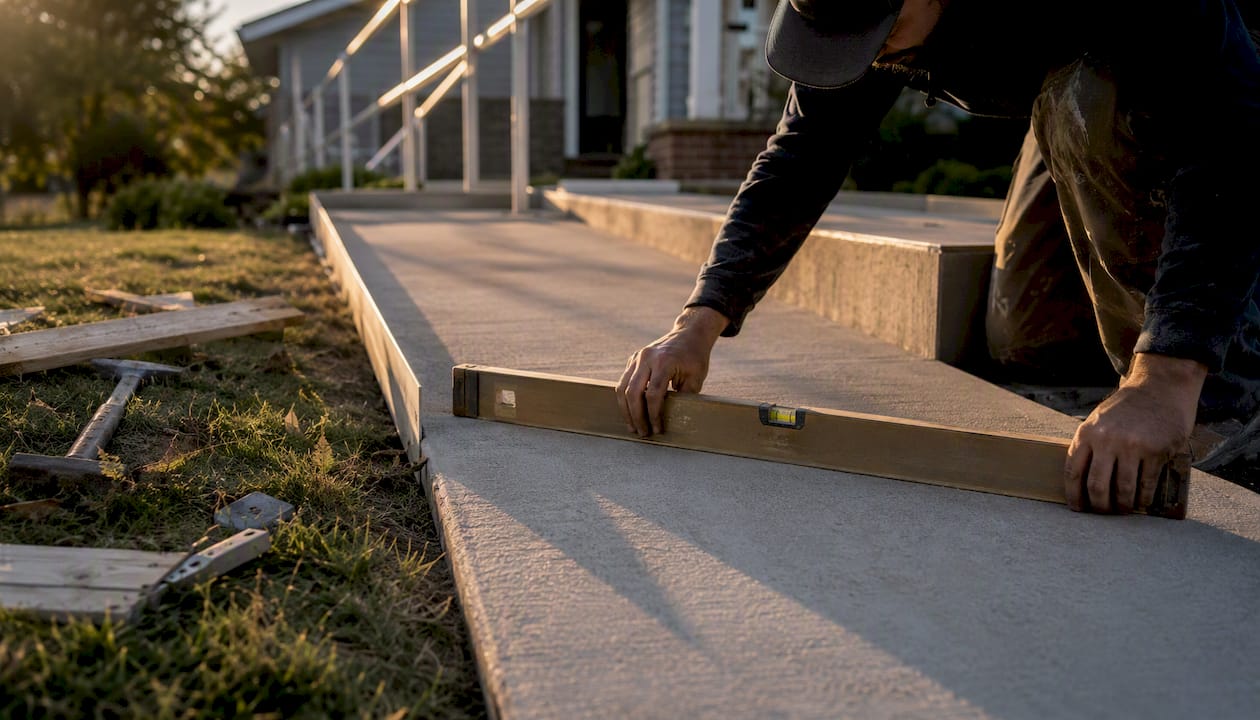
Accessible routes and ramps. Running slope, cross slope, and landing dimensions are all spelled out precisely. A ramp built at the wrong slope is one of the most frequent noncompliance issues on retrofit jobs, often because a contractor eyeballed the rise-over-run instead of measuring it.
Parking and van-accessible stalls. Stall width, access aisle width, and signage height all have exact specifications, and the ratio of van-accessible to standard accessible stalls scales with total lot size. A dedicated ADA parking compliance resource can help you sanity-check striping and signage layouts before a paving crew mobilizes.
Toilet rooms. Fixture centerlines, grab bar placement and length, clear floor space, and turning radius requirements are precise and unforgiving. Toilet centerline errors are one of the most common items flagged in post-construction inspections.
Elevators and lifts. Required where a facility has multiple stories open to the public and no exception applies. Call sizes, floor indicators, and door timing all carry technical specs.
Signage and wayfinding. Tactile characters, Braille, mounting height, and contrast ratios are all defined. A signage specialist familiar with ADA specs can save you a rework cycle compared to ordering standard commercial signage and hoping it passes.
Where full compliance with new construction requirements is technically infeasible, alterations shall comply with the requirements to the maximum extent feasible.
Field checklist for what to record during inspection: clear width at every door and passage, ramp slope measured with a digital level (not eyeballed), signage mounting height and tactile compliance, hardware operability, restroom turning circle presence, and grab bar height and length against spec.
Pro Tip: Keep a copy of the relevant 2010 Standards chapter on-site during construction, not just in the office file. Field crews who reference the actual spec catch slope and clearance errors before they get built, not after an inspector flags them.
How do you plan and execute an ADA upgrade project?
A workable ADA project runs through seven stages, and skipping any one of them is where facility managers usually lose time or money later.
- Initial accessibility audit. Walk the facility with a checklist based on the 2010 Standards and flag every noncompliant element, not just the ones related to your planned renovation.
- Define the scope of alteration. Determine whether the planned work qualifies as an alteration, and if so, which spaces count as primary function areas.
- Estimate path-of-travel costs. Get this number before you finalize your renovation budget, since it determines your 20% cap and therefore your spending ceiling on accessibility work.
- Select a contractor. Prioritize documented ADA experience over general renovation experience alone.
- Permit and plan review. Coordinate with your local building department early, since some jurisdictions layer additional accessibility requirements on top of the federal standards.
- Phased implementation. Sequence work so the highest-priority accessibility elements (entrance, route, restroom) get built first if the project runs into budget or timeline trouble mid-stream.
- Verification and punchlist. Measure the finished work against the standard before calling the job complete, not just against the contractor's own sign-off.
When you're bidding contractors, ask these questions directly:
- Are you licensed in this jurisdiction, and can you show current insurance?
- How many ADA-specific projects have you completed in the last two years?
- Can you provide references from facility managers, not just homeowners?
- What documentation do you provide at project close (as-built drawings, photos, material specs)?
- How do you verify ramp slope and door clearance before calling a task complete?
Rough timeline expectations: small jobs (grab bars, signage, hardware swaps) typically run one to two weeks including procurement. Medium projects (restroom retrofit, entrance ramp) usually run four to eight weeks depending on permit turnaround. Large projects (full path-of-travel overhaul, elevator installation) can run several months once structural and electrical trades are involved.
Coordinate your ADA scope with local building code review from the start. Many jurisdictions layer state-specific accessibility codes on top of the federal ADA Standards, and a plan reviewer catching a conflict mid-permit is far more expensive than catching it during design.
How do you document technical infeasibility or disproportionate cost?
"Technically infeasible" has a narrow legal meaning. It applies when existing structural conditions, like the building's structural frame or site constraints, prevent a modification without an extraordinarily disproportionate expense. It's not shorthand for "expensive" or "inconvenient." The Access Board's guidance makes clear that compliance is still required to the maximum extent feasible, even when full compliance isn't possible.
Build your documentation file before you finalize a decision, not after a complaint arrives. A solid file includes:
- A structural engineer's written assessment of why full compliance isn't feasible.
- Multiple contractor cost quotes showing the disproportionate expense, not just one.
- A breakdown separating primary function area costs from path-of-travel costs.
- Photos and as-built drawings of the existing condition.
- A written record of alternative compliance measures you considered and why each was rejected.
The strongest infeasibility or disproportionate-cost claims usually combine a third-party engineering assessment with at least two independent cost quotes, since a single number is easy for a regulator to question but a documented pattern across multiple bids is harder to dismiss.
Pro Tip: Set up a dedicated project folder with a consistent naming convention (address, date, element, document type) the day you start the audit. Version control matters too; a contractor's revised quote should replace, not sit alongside, the original in your active file. When an inspection or complaint arrives months later, you want to hand over one clean folder, not reconstruct a timeline from emails.
What does a practical ADA retrofit checklist look like on-site?
Most ADA upgrade work at the facility level is handyman-scope, not major construction, and knowing which tasks fall into that category versus which ones need a licensed trade subcontractor saves both time and money.
Standard handyman-level ADA tasks include grab bar installation with proper wall blocking, threshold ramp installation, door hardware replacement (lever handles, closer adjustment), toilet seat height adjustments, and compliant signage installation. Call in licensed subcontractors for anything touching structural framing, main electrical panels, or plumbing rough-in work, since those trades typically require separate permits and licensure regardless of how small the visible task looks.
Before the crew arrives, build a pre-job site checklist:
- Photograph every element to be altered from at least two angles.
- Measure existing clearances, door widths, and slope at the work area.
- Note any access restrictions during work hours (patient areas, active retail floors).
- Have permit documentation on site and visible if an inspector stops by unannounced.
Ask contractors implementation-quality questions specific to ADA work: What fastening method do you use for grab bars, and can you confirm blocking exists behind the wall? How do you verify ramp slope before final walkthrough? Do you install signage per the tactile and mounting-height specs in the 2010 Standards? What's your tolerance for finish work around fixtures?
Pro Tip: Bundle small jobs into a single site visit whenever the schedule allows.
What pitfalls put ADA compliance at risk after upgrades finish?
The most common mistake facility managers make is trusting memory or a past project's dimensions instead of the current standard. Ramp slopes, door clearances, and grab bar heights get quoted from "what we did last time" instead of the actual 2010 Standards section, and that's how noncompliant work gets built and paid for before anyone notices.
Other recurring pitfalls: relying on a digital accessibility overlay tool as a substitute for real Title II web compliance work, failing to update as-built drawings after a retrofit (which creates confusion during the next renovation), and ignoring curb-ramp connections between the parking lot and the building entrance, a spot inspectors check but facility teams often overlook.
Enforcement typically starts with a complaint, either to the DOJ directly or through a private lawsuit under Title III. Good documentation, the kind covered above, is your strongest defense in either scenario. Facilities with organized records of audits, contractor quotes, and infeasibility assessments resolve complaints faster and with less legal exposure than those scrambling to reconstruct history after the fact.
Maintenance checklist to preserve compliance after the upgrade is done:
- Inspect ramps, handrails, and accessible routes for surface damage every 6 to 12 months.
- Confirm door closers still operate within the required opening-force spec, since hardware drifts out of adjustment over time.
- Verify signage remains legible and securely mounted.
- Re-measure clear floor space in restrooms if any fixtures or furniture have shifted.
Pro Tip: Put a recurring calendar reminder on a 6 to 12 month cycle for a compliance walkthrough, and log the date and findings every time, even when nothing needs fixing. An empty log with consistent dates is still evidence of an active maintenance program if you're ever asked to show one.
Why proactive ADA upgrades pay off more than reactive fixes
Every facility manager I've talked to about this eventually asks the same question: is it cheaper to wait until something forces the issue, or to get ahead of it? The math almost never favors waiting. A complaint-driven fix happens on someone else's timeline, often with legal costs attached and no room to phase the work around your budget cycle. A planned upgrade lets you spread costs across a fiscal year, batch small jobs into single site visits, and negotiate contractor pricing instead of paying rush rates.
There's also a customer-access argument that gets undersold in most compliance guides. An accessible entrance, a properly sloped ramp, and a restroom that actually works for a wheelchair user aren't just legal checkboxes. They're the difference between a customer walking in and a customer turning around in the parking lot. Retail and hospitality facility managers I'd point this out to often underestimate how much foot traffic they're quietly losing to inaccessible design, because that customer never files a complaint. They just don't come back.
The one place I'll push back on conventional advice: don't wait for a "big renovation" to trigger your ADA review. Plenty of facility teams treat compliance as something that only comes up during a major remodel, which means smaller, cheaper opportunities to fix readily achievable barriers get ignored for years. Home and facility accessibility upgrades don't need to wait for a capital project. Grab bars, hardware swaps, and signage can happen on their own schedule, funded out of a maintenance budget instead of a capital one.
Get a qualified local contractor involved early, before you've finalized scope with an architect. The gap between what a plan reviewer approves and what actually meets the technical standard is where most rework costs come from, and a contractor who's done this work before catches that gap on paper instead of after installation.
How MaddLadder handles ADA upgrades for your facility
If you're staring down a list of grab bars, ramps, and hardware swaps and wondering whether you need a full architecture firm or just someone who can execute correctly, MaddLadder is built for exactly that gap. We handle the safety and accessibility upgrades facility managers and property owners actually need on a routine basis, without requiring a general contractor's overhead or a multi-week bid process for a job that should take a day.

Here's what that looks like in practice: grab bar installation with proper wall blocking, threshold ramp fabrication and installation, door hardware replacement, toilet seat and fixture adjustments through our plumbing and electrical services, and documentation support so your permit file stays clean. If you're also updating access control or thermostats as part of the same visit, our smart home upgrade services can bundle into the same site call.
Request an estimate through MaddLadder's services page and get a scoped quote before you commit a budget line to guesswork.
Where to find the official ADA compliance documents
Keep these sources bookmarked. They're the ones that actually settle disputes when a contractor, inspector, or regulator questions your scope.
- The Access Board's Chapter 2 guide explains alterations, additions, path of travel, and the disproportionate-cost test in plain regulatory language.
- The ADA Standards for Accessible Design is the technical rulebook covering both scoping and exact dimensions for new construction and alterations.
- The Guidance on the 2010 ADA Standards clarifies what changed from the 1991 Standards and explains DOJ's reasoning behind current requirements.
- The 2010 Standards index at ADA.gov hosts the full technical PDFs organized by chapter, the place to check exact measurements before a field crew starts work.
- The ADA National Network (adata.org) operates regional technical assistance centers that answer facility-specific questions the statute doesn't spell out directly.
For technical dimensions, always check the actual standard rather than a summary article, including this one. For scoping questions specific to your facility type, the DOJ's ADA Information Line and your local building code official are your two most reliable next calls. When a project's infeasibility or disproportionate-cost argument is close, consulting an independent ADA specialist before you finalize the decision is worth the fee compared to defending an undocumented judgment call later.